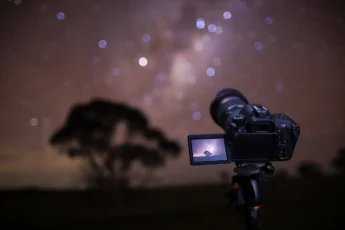
Exposure and composition are the foundations for creating great photos. If you don’t understand these concepts, you will never be able to take your camera out of auto mode. Images are created when light hits a camera sensor. Controlling the amount of light and how it hits the sensor is the most important thing to master.
Crash Course Series
- Introduction
- History of Digital Cameras
- Equipment and Accessories
- Types of Photography
- Exposure and Composition
- Choosing Your Equipment
- Practice
- Additional Resources
- eBook
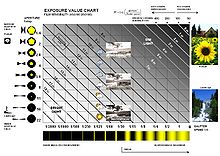
The Exposure Triangle
Shutter speed, aperture/f-stop, and sensitivity/ISO are often referred to as the Exposure Triangle. We will cover all of the foundations of digital photography, but these three control a large amount of your final result. On most cameras, when you change the dial to Manual mode, you’ll see these three settings somewhere on your screen. Given how unfamiliar these numbers look, some people decide to return to Auto mode. But you’ll quickly find that the concepts and settings are easily understood with a little time and practice. And the more you play with them, the more familiar they will become.
Shutter Speed
Of the three, shutter speed is the easiest to understand. Shutter speed is usually expressed as a fraction of a second, such as 1/30th of a second. Each step in shutter speed halves the amount of light reaching the image sensor. 1/60th of a second allows in half as much light as 1/30th of a second.
Camera shutters come in two forms nowadays. The first is a plastic or metal wall or curtain that sits in front of the image sensor. When you’ve chosen your settings and click the shutter button, the shutter flips open. Light can then stream from the lens directly onto the image sensor. And then the shutter quickly flips closed to seal off the image sensor. A camera with extremely fast shutter speeds may even have a shutter split into two halves. Two halves of a single shutter only have to go half as far to meet, allowing much faster shutter speeds. Mechanical shutters max out at around 1/8000th of a second, fast enough for most types of photography.
But there is also a second way to control shutter speed. Electronic shutters are commonly found in smartphone and mirrorless cameras. Some DSLR models have them as well. Instead of the physical shutter moving, the image sensor activates and deactivates for the amount of time. Electronic shutters have three main advantages. The first is that they can use faster shutter speeds than most mechanical shutters. Many consumer level models reach 1/16000th of a second. The second is that they are entirely silent. Depending on your camera, sometimes the shutter mechanism makes enough noise to be considered annoying. For the wedding and street photographer, an e-shutter is a great feature. And third, they eliminate a source of extra shaking that could cause blur in your final photo.
A downside to e-shutters is that the flash option is often disabled for DSLR/mirrorless cameras. This is because e-shutters for these cameras are usually rolling shutters. Instead of the sensor fully activating on and off, the camera only activates a row of pixels at a time. It activates row after row, traveling down the length of the sensor for the full shutter speed time. A flash is so brief, only a few rows would capture the light from the flash unit. That would leave an odd stripe of brightly exposed photo in an otherwise dark image. Also, this method of activation means you’ll get odd motion blur and bending of fast-moving objects. Ironically, electronic shutters are poor for fast-moving objects, which is usually when you need fast shutter speeds. To really freeze action, you want to use a mechanical shutter. But having both options on a camera is very handy.
It’s worth mentioning global e-shutters (image sensors that activate and deactivate all at once) do exist. But they’re not currently available for anything other than video cameras; the technology is still being worked on for digital photography. Video cameras tend to start at $1000 and go up in price from there. A practical global e-shutter for consumer-level photography could fully replace mechanical shutters.
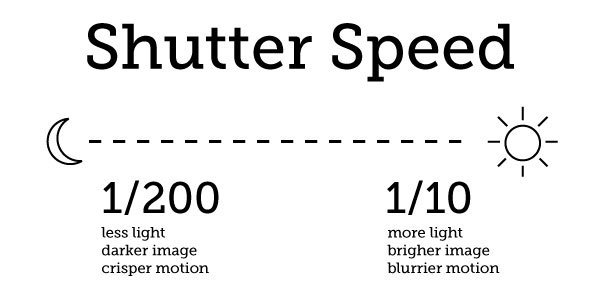
How shutter speed affects your photo.
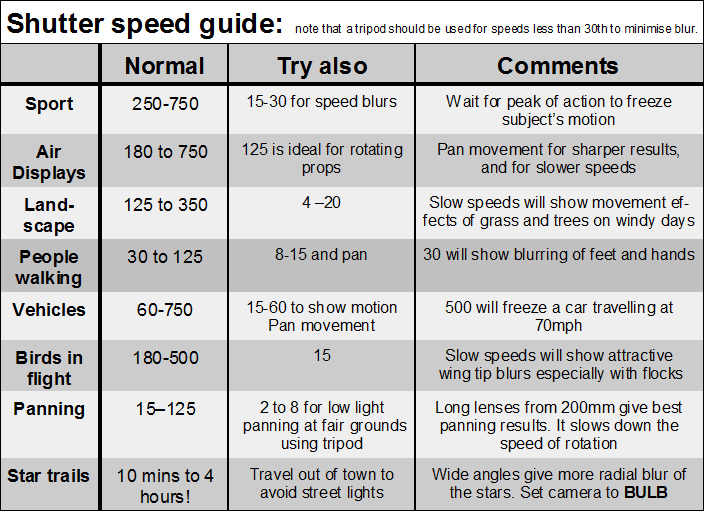
How shutter speed affects your photo when taking an action shot.
Aperture/f-stop
Aperture is simple in nature but has a major role to play in photography. By definition, an aperture is a hole for light to pass through. The aperture is where light streams through the camera lens. But things get a bit complex once you start changing how large or small that hole is.
Aperture is expressed using the letter f, followed by a number. F/X is a ratio of focal length to the diameter of the aperture. It doesn’t have a hard measurement, like mm or cm. F/X lets you describe the aperture of a large telephoto lens and a tiny prime lens, in the same manner. Even though both lenses have different measurements at the same aperture, f/4.5 is the same ratio for both.
Aperture, like shutter speed and sensitivity, controls exposure. Each number, or stop, of aperture means that the hole is twice as large as the one after it. F/2.8 is twice as large as the next stop, f/4.0. This also means the aperture is letting in twice as much light at f/2.8 as f/4.0. It sounds strange to want to make the hole that lets light in smaller, but it serves two important purposes. One, because aperture controls exposure, letting in less light is useful if a scene is too bright. And two, aperture controls depth of field, which is how much of a scene is in focus. The smaller the aperture, the more of a scene is in sharp focus. And with a larger aperture, less of a scene is in focus.
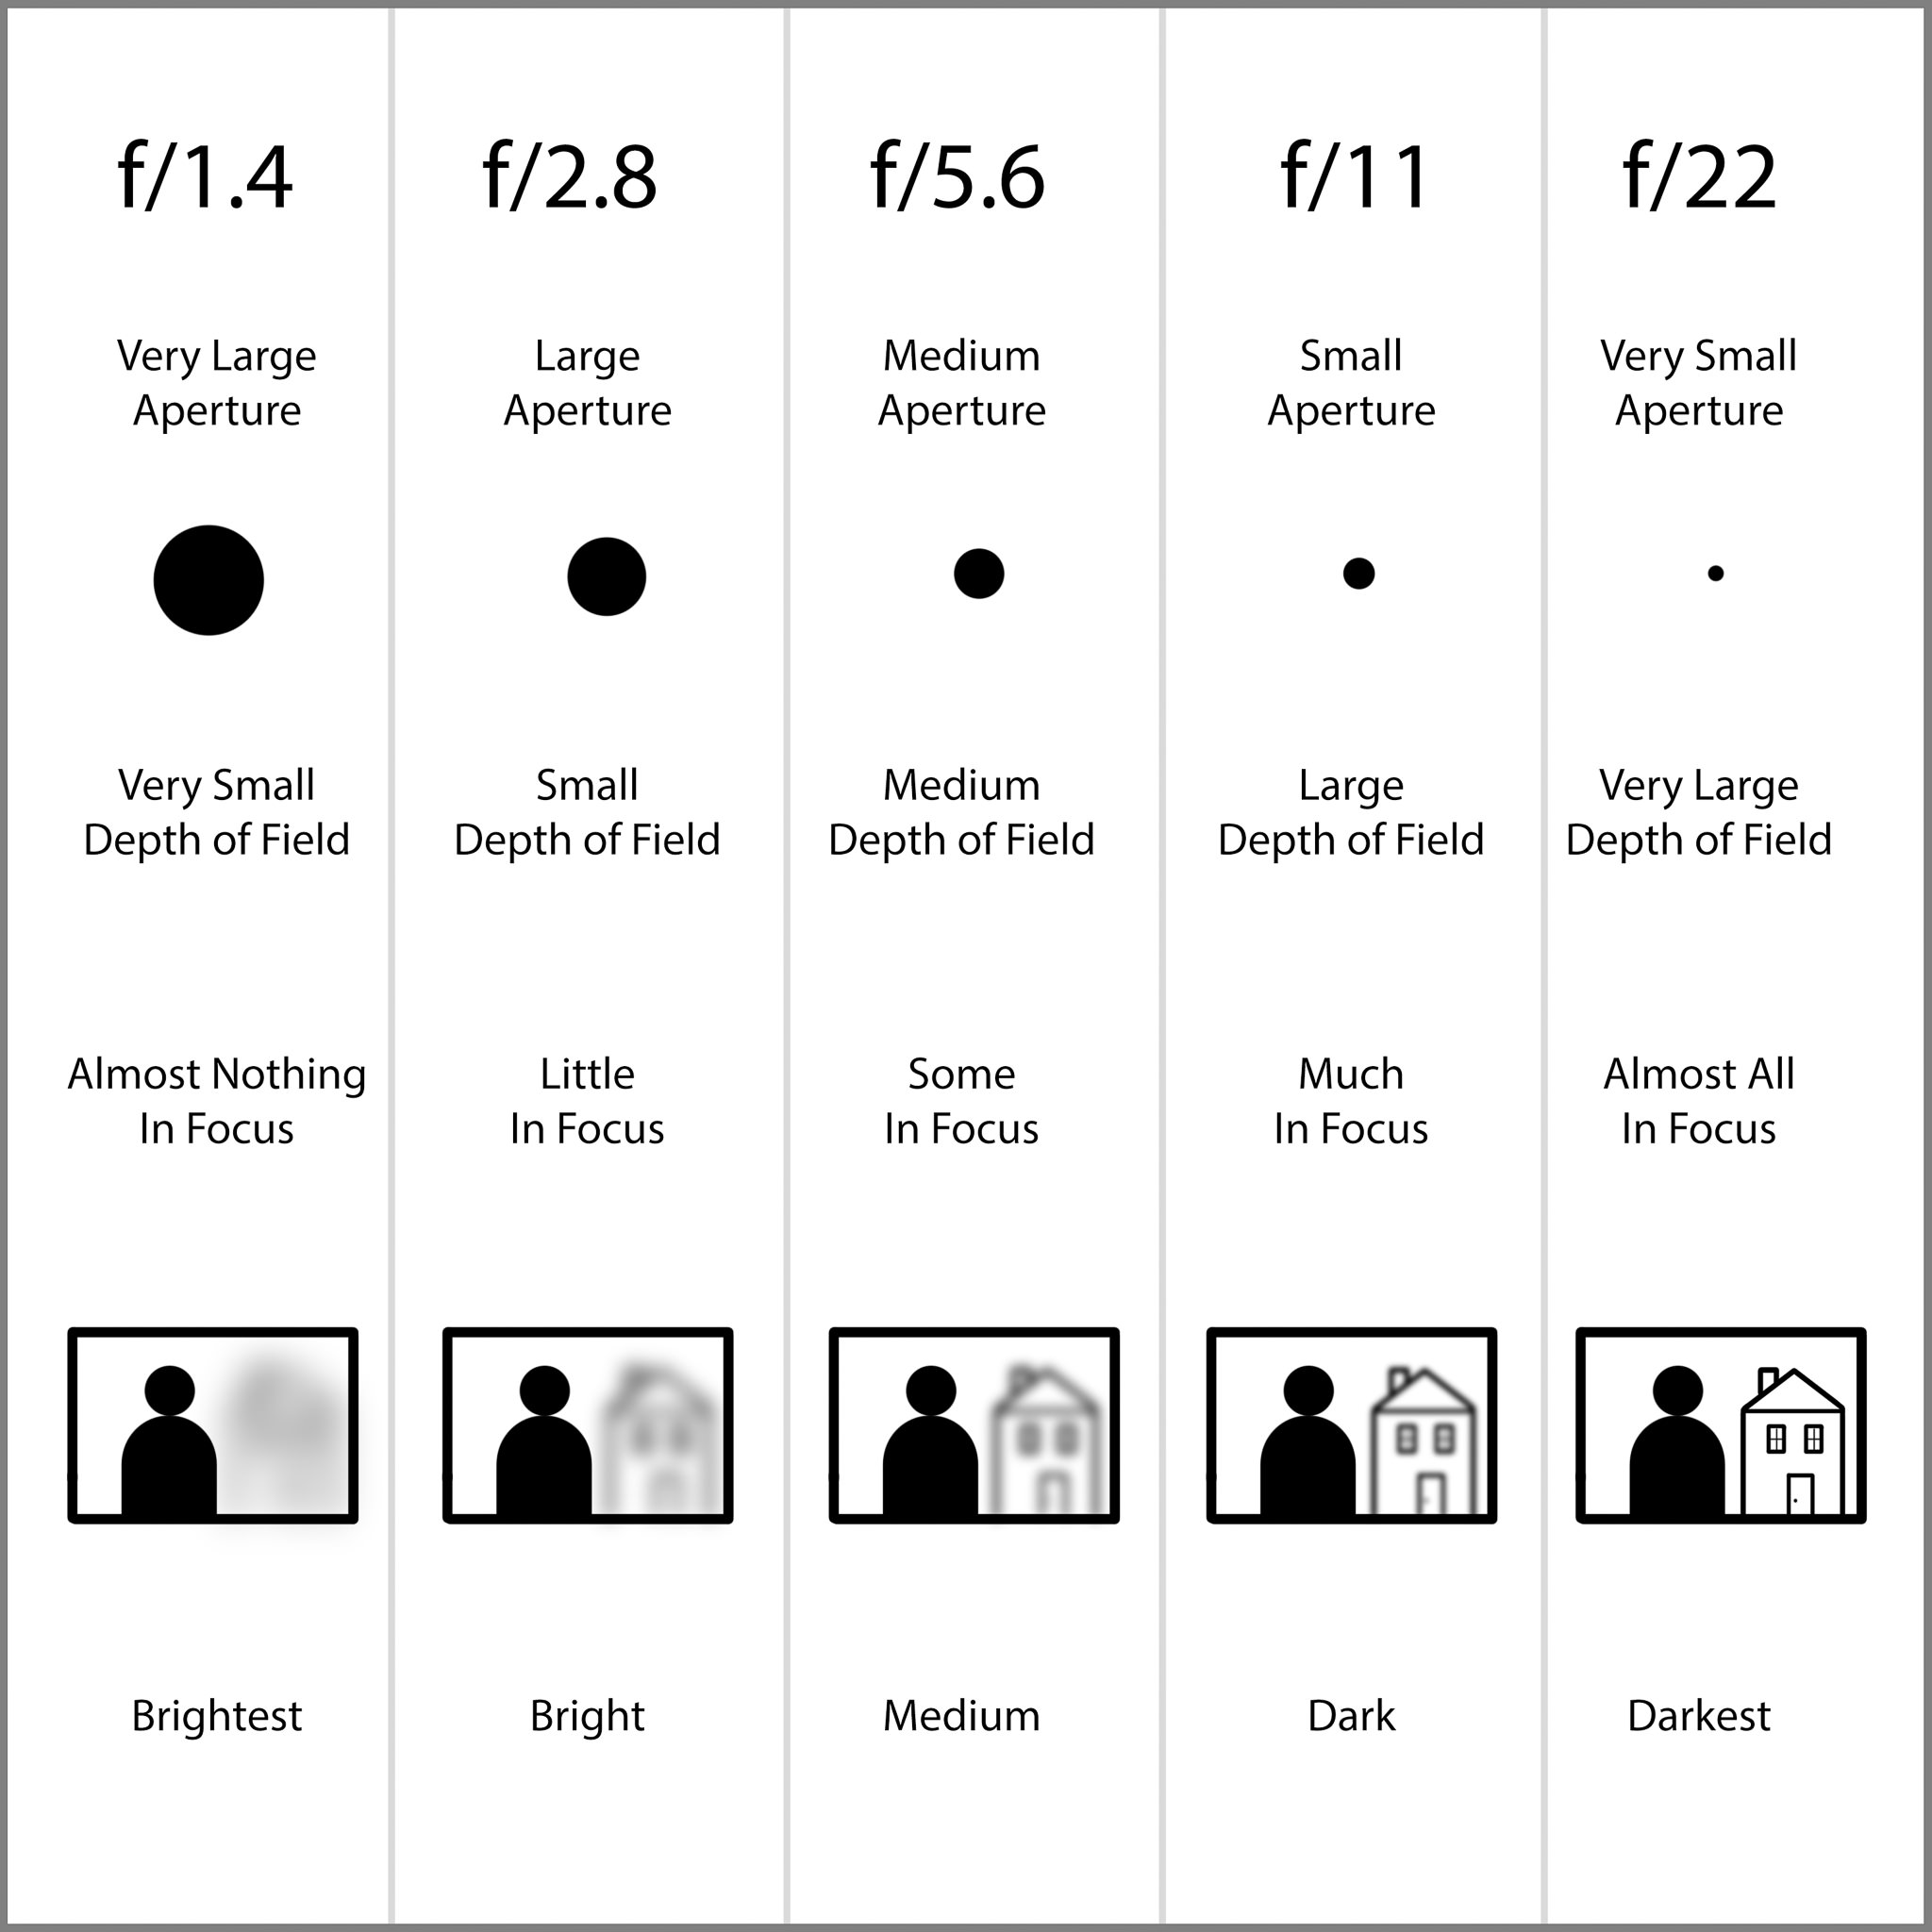
How aperture affects your photo.
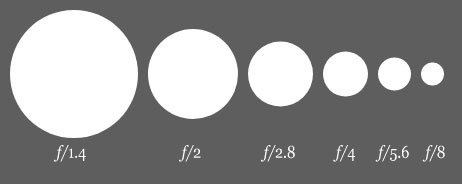
Diagram of decreasing aperture sizes (increasing f-numbers) for “full stop” increments (factor of two aperture area per stop).
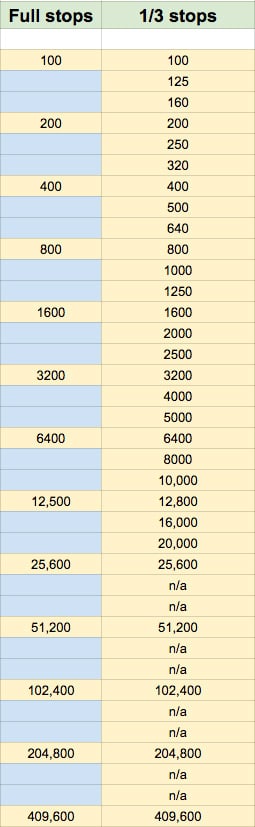
Sensitivity/ISO
Sensitivity will be referred to as ISO from here on, as that’s how your camera will describe it. ISO is the value of your image sensor’s sensitivity to light and is foundational for the other two exposure controls. ISO is a number taken from the ratings for photographic film sensitivity. The higher the ISO number, the more sensitive the film or sensor is to light. And like aperture and shutter speed, each step in ISO is a doubling or halving of light exposure. ISO 200 only needs half as much light as ISO 100 for the same exposure level. Like film, ISO 100 or 200 is usually the lowest setting modern digital cameras operate at. In bright sunshine, ISO 100 is the best setting. In deep shade, ISO 400 is more useful. Shooting night photography in a major city? ISO 6400 might be best for you.
On many cameras, the ISO value often has a picture of a scene where you’d want to use that value. For example, ISO 100 might have a picture of a flower in a bright sunny field. But the higher the ISO value, the higher the chances of noise artifacts (or grain) creeping into your photos. At the highest ISO values, even interference from the many electronic elements of the camera can register as “light” to the sensor. So it’s best to use as low an ISO setting as possible. But not so low that shutter speed and aperture exposure become compromised.
How ISO affects your photo.
How are these used in Photography?
Shutter speed, Aperture/f-stop, and Sensitivity/ISO all control exposure, just in different ways. Shutter speed gives control over motion and action in a picture. When a subject is moving, a fast (also referred to as high or short) shutter speed will keep any motion blur out of your photo. The closer to you, and faster the subject is moving, the faster shutter speed you need. 1/250th of a second is good for children at play, while 1/2000th of a second might be needed at a car race track. Distance from you to your subject matters because a closer subject will move across your scene much faster. A race car photo taken from a distance doesn’t need as fast a shutter speed as one moving directly in front of you.
A slow (or low or long) shutter speed lets in more light. If you’re taking a portrait in low lighting, a fast shutter speed would leave everything looking too dark. Aperture and sensitivity can be changed to provide more light, but both have limitations. Changing ISO may make things noisier than you want. And the reason we don’t want to change aperture has to do with focus, which we’ll get to next. Simply lowering the shutter speed will let in more light and give better exposure. Remember that the shutter is moving more slowly with a slower shutter speed. If the camera is moved while the sensor is exposed, your photo will show blur. Depending on your camera, and features like image stabilization, shutter speeds slower than around 1/125th of a second are when you want to use a tripod.
Aperture’s key use is that it controls depth of field. Depth of field is how much of a scene is in sharp focus. An aperture of f/1.8 will create a photo where the subject, or a portion of a large subject, is in sharp focus. This is usually referred to as an open aperture, as the hole is very large. But the background of the scene will have a blurred look to it. And points of light in the background may become nearly featureless, yet beautiful artifacts called bokeh. For a portrait photo, this is the aperture size you’d want to be using.
When using a more closed off aperture, such as f/16, most everything in the scene will be in focus. For a landscape photo, we want to see the lake near us as well as the background mountains. A closed aperture will keep blur from appearing anywhere in the scene. Remember, what is considered a closed or open aperture depends on the scene and your distance from the subject. For a macro photo of a lone flower, f/1.8 might be too open. Your depth of field might only capture half of a single petal if you’re too close. It seems a bit counter-intuitive since larger numbers mean smaller openings and less light. But a good way to remember aperture is that a small f/stop means a small part of a scene will be in focus. And a larger f/stop means more of the scene is in focus.
So when do we adjust the ISO value? If we want to keep a fast shutter speed in a low light scene, ISO is usually the best adjustment to make. Remember how shutter speed lets in less light the faster it becomes? If we don’t want to change our aperture, which would alter our focus, we have to raise the ISO. That way, raising my shutter speed to freeze the action doesn’t result in a darker photograph.
Most digital cameras have Auto ISO as an option when selecting your ISO value. This means you keep full control over shutter speed and aperture while the camera chooses the best ISO value. For most photography types, Auto ISO is a great choice as it’s the setting you’ll be changing the least. But keep an eye on the resulting images. If things look too dark or bright despite a good shutter speed and aperture, manually adjusting your ISO is a good idea. The camera doesn’t necessarily know what sort of effect you’re trying to create. Sometimes a scene is naturally too bright as well. Either raising shutter speed or lowering the ISO value, or both, will help darken things to your liking.
The interplay of the Exposure Triangle takes a lot of experimentation and practice because all three overlap to control light exposure. Your camera should have two functions to get you started: Aperture Priority mode and Shutter Priority mode. Aperture priority mode usually has the symbol “A” or “Av” on the selection dial, and will show up on the LCD screen when chosen. This lets the photographer choose the aperture, while the camera chooses a shutter speed that will give proper exposure. It’s a semi-auto mode that’s good for a quick photo if you know exactly what you want to achieve. Use aperture priority mode to understand how aperture affects depth of field. You can use the dials on your camera to open or close the aperture and compare the results. You’ll quickly see why depth of field control is important to understand.
Shutter priority mode does the opposite; it allows the photographer to choose shutter speed, and the camera chooses the aperture. The symbol is usually “S,” “Sv”, or “Tv.” Try using shutter priority mode anywhere there are moving subjects, such as near a busy road. Notice how the action slows and freezes with faster shutter speeds. And how slower than around 1/400th of a second, you’ll start to encounter motion blur from the movement of the cars. Your shutter speed may even go as slow as 1 second or slower. These can be used for very long exposures, such as night photography. Used on a sunny day, you’ll only get a blurry, overexposed mess. But try using long exposures with a tripod at night. These two semi-auto modes are great for understanding the exposure triangle and its use in photography.
How Aperture, Shutter Speed, and ISO affect your photo.
Natural Light
There are the two major light sources most photographers will find themselves using, natural light and flash. The first is natural light, which is that of the sun. As the sun moves across the sky over the course of the day, the intensity, color, and warmth of that light will change. Understanding how natural light works with a subject will drastically improve your photography.
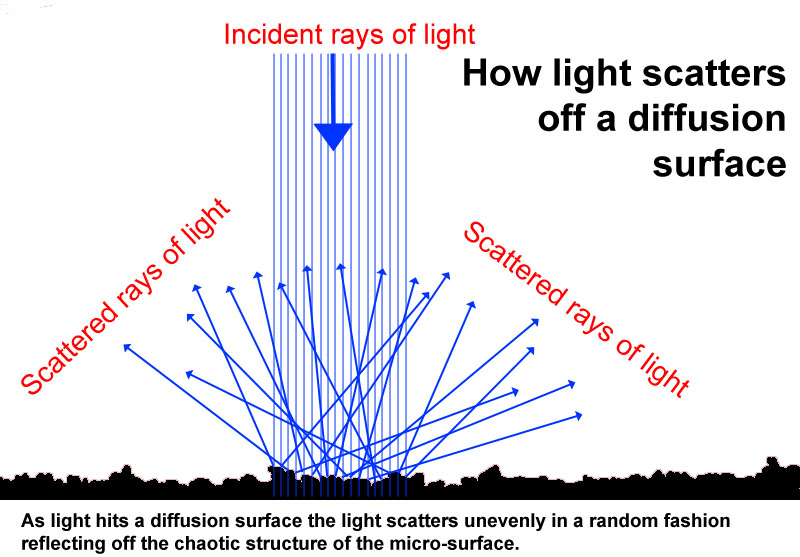
A common mistake is to always wait for a bright sunny day to take photos. While there’s nothing wrong with a cloudless day, the lighting tends to be harsh and creates deep shadows. When photographing a person, you’ll find dark shadows in the eye sockets. And the skin can have a washed out character from that direct sunlight. Overcast days are just as good, if not better, for many subjects. The cloud cover acts as a light diffuser.
In flash photography, a light diffuser helps scatter the light around a subject. Instead of a harsh flash and dark shadows, the subject is much more evenly lit by the light source. Of course, if you’re shooting wildlife or landscapes, a bright sunny day works just as well as any other. Sometimes that type of lighting is appropriate for your scene. If you wanted to show the efforts of runners struggling to cross the finish line, direct sun will add to the feeling of intensity. And a tiger creeping through the woods will look much better with deep shadows surrounding it.
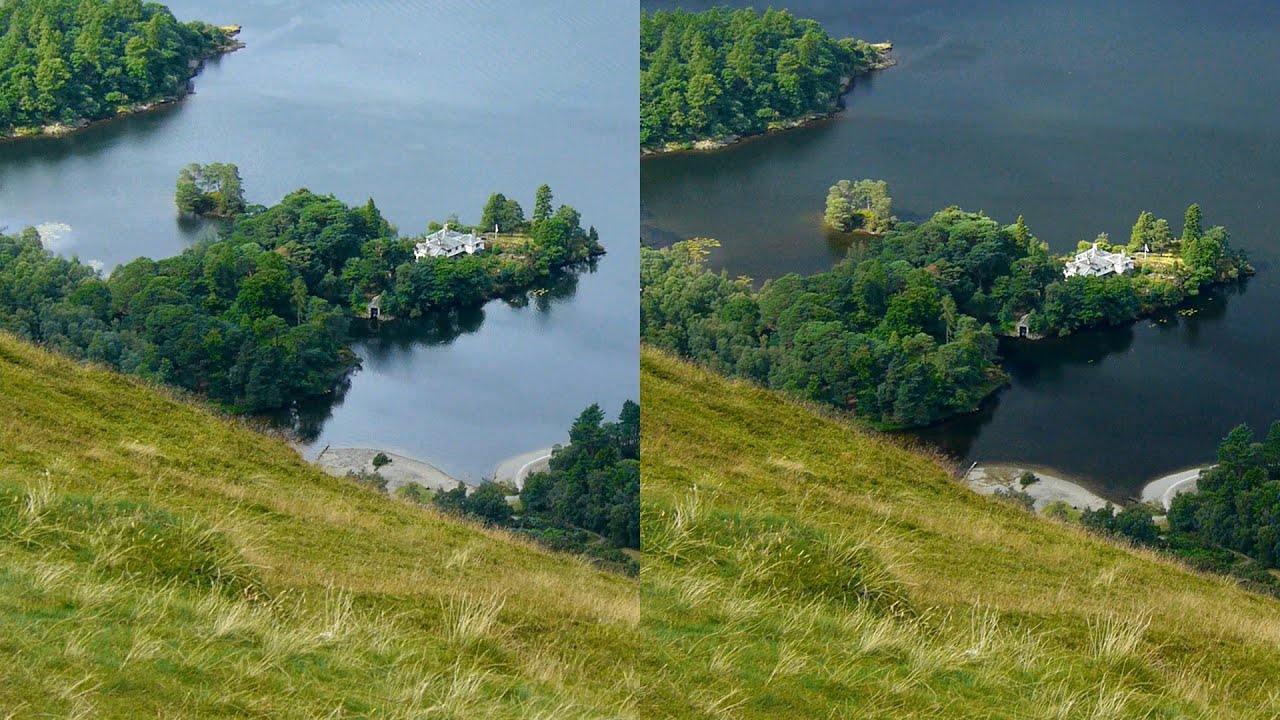
A polarizing filter is also good to have if you’re shooting in bright daylight. As described previously, polarizing filters help cut out scattered light wavelengths, but this makes them poor to use in shade or during cloudy days. They make blue skies darker with better contrast and reduce glare from water and glass.
Another great time to do photography is during the early morning or evening. About an hour after sunrise, and an hour before sunset, is known as the Golden Hour. This is when the sun, still low to the horizon, has a warmer cast to it as the light filters through more of the earth’s atmosphere. Also, the extra layers of atmosphere act as a light diffuser to create a more even lighting across a subject. But because the lighting of the sun is not pure white light, as it is at midday, you should look at the camera’s white balance settings.
Most digital cameras come preset with auto white balance. But switching to manual mode to adjust white balance is a really good idea whenever the lighting is less than full and bright. Incandescent and fluorescent lights often have their own white balance presets. As do direct sun, shade, and sunrise/sunset.
How a light diffuser affects your photo in sunlight.
How a polarizing filter affects your photo in sunlight.
Flash Photography
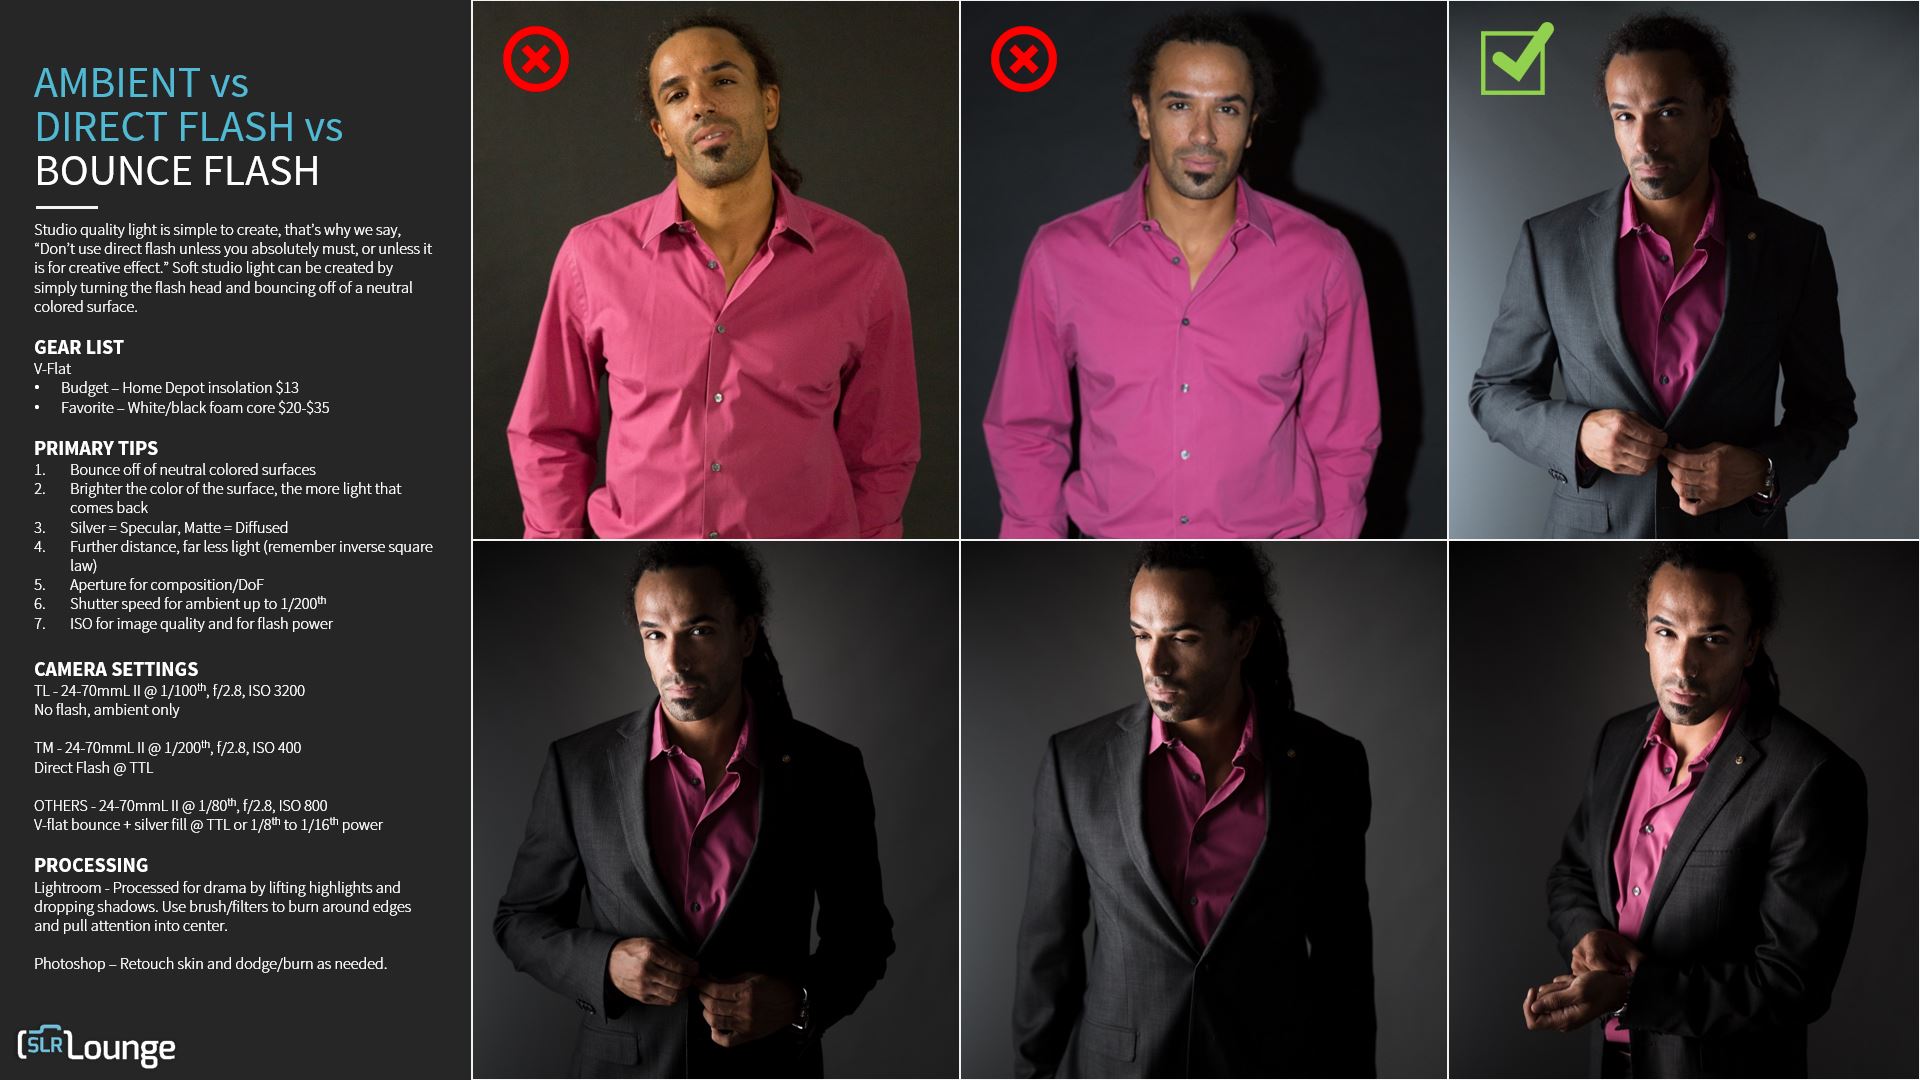
Most digital cameras allow the user to choose between two main types of flash use; manual and TTL (through the lens). Manual flash is just like manual mode; the photographer can choose how powerfully the flash fires. TTL mode is an auto setting where the camera first fires a test flash to gauge the brightness of a scene. The camera then fires the flash a second time, with the result being a properly exposed picture. Both have their place.
TTL flash is useful but sometimes you don’t want the entire scene brightly lit. Maybe you only want the subject to stand out, and the background to remain dark. Or maybe everything is very near perfect, but you just want a little extra fill flash for your subject. Fill flash is meant to add a little extra light into pockets of shadow. For any kind of subtle flash adjustments, you’ll want to use the manual flash setting.
Sometimes your flash can adjust the direction in which it fires. If so, or if you have an extra hot shoe flash attachment, it’s often better to bounce the flash off a nearby wall or ceiling. The subject will then be hit by more diffused light and look more evenly lit. This is only to be used if the wall or ceiling is white or nearly white. Otherwise, the subject will be colored by the reflected light. Also, remember that you’ll need to increase your exposure by making the flash more powerful or by increasing your aperture or ISO. The wall or ceiling will absorb some of the flash, and the distance from light source to subject is also greater. Likewise, a dark surface will simply absorb all of the light you’re attempting to bounce off of it. Manual mode is best when bouncing a flash.
Flash softbox diffusers that sit over the flash unit are excellent accessories to reduce the harshness of the light. Flash bounce cards, or even a simple white business card, are also good tools to have. They allow the photographer to direct light on a subject in useful ways if no walls are present. Finally, combining flash with natural, bright sunlight, can give beautiful results. When shooting a subject backlit by the sun, the shadows that form around the front can be distracting and unnatural looking. Using flash will ensure the subject looks attractive and well-lit. This is why understanding how to use fill flash is important, even during a bright sunny day.
The Rule of Thirds
The Rule of Thirds is a simple and effective way to ensure your photographs capture the attention of your viewers. To use the Rule of Thirds, simply imagine your scene as evenly divided by two parallel lines going right to left, and two more going up and down. Many digital cameras have a setting to allow you to see these lines when looking through your viewfinder or LCD panel. It’s a very good idea to leave the lines on at all times.
This rule takes advantage of how our eyes tend to follow certain points of interest in a scene. We have a knack for recognizing symmetry in a scene, and the lines help the photographer capture that natural beauty. For example, if shooting a picture of a landscape, the horizon should be aligned with one of the horizontal lines in the scene. Any points of interest, such as the sun or a tree, should be at or near where a horizontal and vertical line cross each other.
Even in something as seemingly straightforward as a portrait, the Rule of Thirds is important to remember. The subject’s eyes are a focal point in any photograph. They should either line up along a horizontal line, or one or both eyes should fall where the lines intersect.
Another way to use the Rule of Thirds is to divide a scene into separate zones. If shooting a forest scene, the lake in front of the forest would be the first section. The trees themselves sit in the middle of the scene. And the bright sky occupies the top section. But rules are often meant to be broken; excellent photography can come from bending or ignoring this rule. But familiarizing yourself with the Rule of Thirds first, will help you take photos with mass appeal. And from there, you can become even more creative in your work.
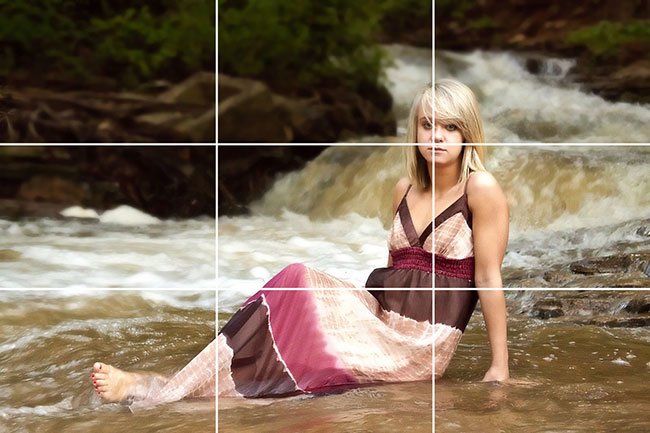
Using the rule of thirds, we can see that the points of interest should be on the lines and where they intersect.